
 English
FLARE3D EXPORTER BASICS
You will find the "Flare3D" menu on the 3DMax drop-down menu bar at the top of your screen. The first item listed on the "Flare3D" drop-down menu is the "Export" option and the second item is the "Preview" option.
There are two ways to preview 3D content in Flash. The "Flare3D Preview" direct option takes the Exporter's configured options by default. To modify these options, click on the "Flare3D Exporter" option and select the "Preview" button for previewing.
The Exporter includes the following options:
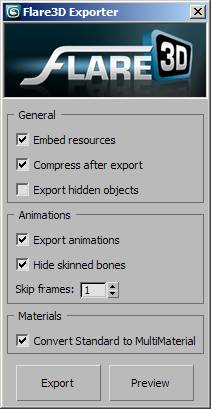
Embed resources: it stores all the resources and textures in one single F3D file.
There are two main advantages to this option. In first place, as the entire content is stored in one single file, you will not have to worry about texture paths or missing resources. In other words, all the required items are included in the same file.
In second place, as only one file is required, its download will be much faster and easier when published on the web.
If we choose not to include any resources, these will still be exported in the same folder of our F3D file as external resources. This will allow you to change textures and carry out tests without the need to export these changes again.
Compress after export: It reduces file size after its export.
Flare3D files can be compressed so as to speed up file download and save space. This compression involves no loss and allows for perfect reconstruction of the original objects after decompression.
You will achieve best results when compressing 3D objects and animations, as textures in JPG and PNG formats come pre-compressed.
F3D files can be compressed at any time, even after being exported, by right-clicking the F3D file and then selecting the "Compress" option. This action can also be performed from the "File" menu of the "Flare3D Explorer".
Export hidden objects: It exports hidden objects in 3DMax viewports. If they are not to be exported, a reference to them will still be maintained.
This option can be selected, for example, to create invisible zones that are to be used for collision detection or to set objects that need to be either initially hidden or just for reference.
If this option is not selected, all hidden objects will be exported as empty 3D objects, though they will include information about animations and their properties.
Export animations: It enables the inclusion or exclusion of all object animations.
A scene including many or large animations is likely to take too long to export. You can get faster previews by deactivating animations, thus reducing export times.
Hide skinned bones: Bones listed in the "Skin" modifiers will automatically be exported as hidden objects.
Bones in animated objects will usually remain hidden. However, this option can be disabled to carry out tests or in specific cases.
Skip frames: It exports animation frames according to the configured interval. The missing frames will be automatically interpolated. For example, a value of '1' will include all the frames and a value of '3' will include one every three frames.
This option allows you to reduce file size to the max. The difference will be more remarkable if we have a large number of animated objects (for instance, a complete character) or very long animations.
For example, for a Value of "4", frames 1, 5, 9, 13... are to be exported.
Convert Standard to MultiMaterial: Standard materials using texture will be converted to Flare3D MultiMaterial for shading and lighting.
Please bear in mind that this option is intended for basic uses and directly affects the final performance of the 3D content. Certain compatibility with Standard 3DMax materials is maintained; however, we strongly recommend using Flare3D materials since they have been specially optimized for Flash.
In Flare3D, Standard material can use a color channel or a texture channel, though they cannot be used simultaneously. If the material is used with the texture channel, this will be seen without shading (as if it had "Self Illumination"). By activating this option, Standard material will automatically turn into MultiMaterial with two channels: one will be used for texture and the other for shading.
If material parameters are to be modified through code, special attention should be paid, as Standard material and Multimaterial methods and properties are not the same and may result in undesired effects.